Añade notificaciones a tu app de expo
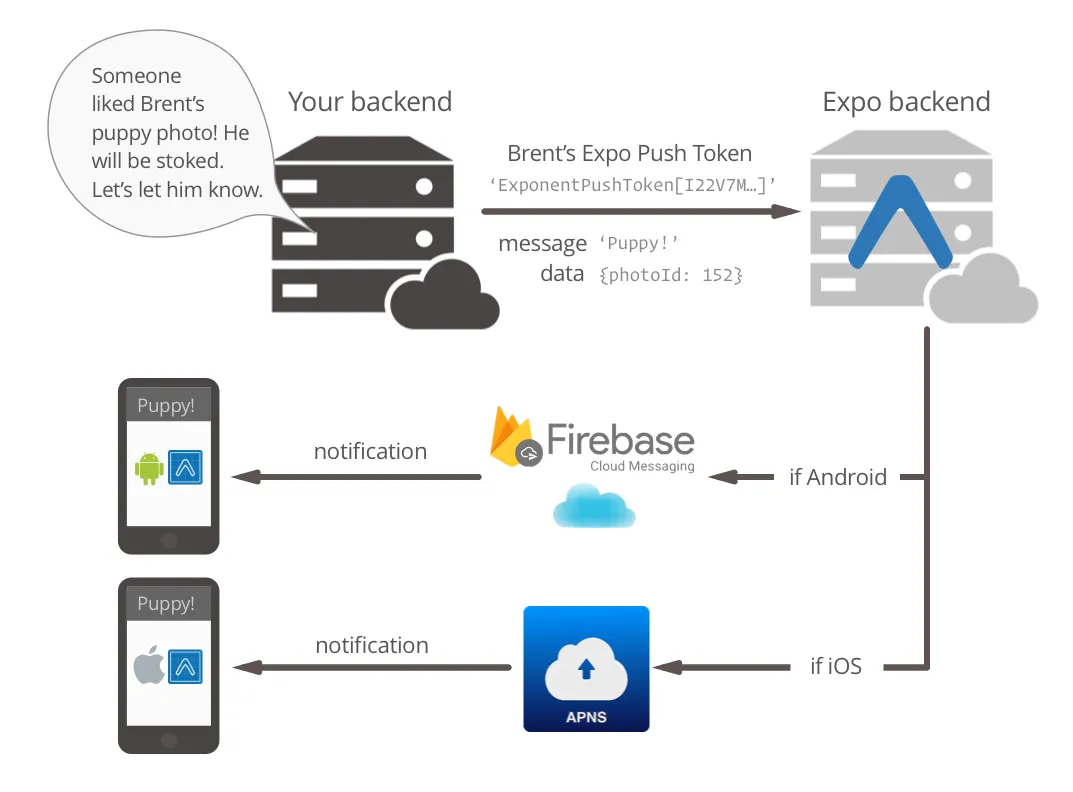
Las notificaciones son una parte fundamental de cualquier aplicación para poder comunicarte con tus usuarios. En el post de hoy vamos a añadir el soporte para notificaciones en tu expo app.
expo
Utilizando el módulo de notificaciones de expo vamos a añadir soporte para estas en nuestro proyecto. Además de lanzar las acciones correspondientes cuando los usuarios interactúan con las notificaciones como puede ser navegar a una pantalla determinada.
Adding expo notification module
Como siempre empezamos instalando los paquetes necesarios.
yarn add expo-notifications
Obteniendo un expo-token
Lo primero que tenemos que hacer para hacer funcionar nuestras notificaciones es obtener un token de notificaciones de expo. Este token nos servirá para poder mandar más tarde las notificaciones al usuario de nuestra aplicación, el token es único por dispositivo y sirve para identificar a un usuario en concreto.
Introducimos la siguiente función en nuestro App.js.
const registerForPushNotificationsAsync = async () => {
  let token;

  if (Constants.isDevice) {
    // we check if we have access to the notification permission
    const { status: existingStatus } = await Notifications.getPermissionsAsync();
    let finalStatus = existingStatus;


    if (existingStatus !== 'granted') {
      // if we don't have access to it, we ask for it
      const { status } = await Notifications.requestPermissionsAsync();
      finalStatus = status;
    }
    if (finalStatus !== 'granted') {
      // user does not allow us to access to the notifications
      alert('Failed to get push token for push notification!');
      return;
    }

    // obtain the expo token
    token = (await Notifications.getExpoPushTokenAsync()).data;

    // log the expo token in order to play with it
    console.log(token);
  } else {

    // notifications only work on physcal devices
    alert('Must use physical device for Push Notifications');
  }

  // some android configuration
  if (Platform.OS === 'android') {
    Notifications.setNotificationChannelAsync('default', {
      name: 'default',
      importance: Notifications.AndroidImportance.MAX,
      vibrationPattern: [0, 250, 250, 250],
      lightColor: '#FF231F7C',
    });
  }

  return token;
}
Lo primero que comprobamos es que estamos utilizando un dispositivo físico mediante el modulo de Constants, las notificaciones no funcionan en los emuladores, asi que para poder probarlas debes usar un móvil con expo go.
if (Constants.isDevice)
Si no sabes como hacerlo te recomiendo leer el post sobre cómo configurar un proyecto de expo.
Una vez comprobado que no estamos en un emulador el siguiente paso es ver que el usuario nos ha concedido acceso a las notificaciones.
const { status: existingStatus } = await Notifications.getPermissionsAsync();
Si no tenemos acceso al permiso, se lo pedimos al usuario de la siguiente manera:
if (existingStatus !== 'granted') {
    // if we dontt have access to it, we ask for it
    const { status } = await Notifications.requestPermissionsAsync();
    finalStatus = status;
}
if (finalStatus !== 'granted') {
    // user doesnt allow us to access to the notifications
    alert('Failed to get push token for push notification!');
    return;
}
Puede darse el caso que el usuario no nos conceda el permiso y entonces no podremos hacer mucho más.
En caso de tener acceso a las notificaciones ya podemos registrar nuestro expo token.
token = (await Notifications.getExpoPushTokenAsync()).data;
Finalmente añadimos una configuración necesaria para los móviles Android.
Creando los listeners para las notificaciones
El siguiente paso es declarar las funciones que se encargaran de manejar las notificaciones cuando las recibamos en nuestra aplicación.
La primera de ellas es la que se lanza siempre que recibimos una notificación. El caso más común será guardar la notificación en nuestro estado de redux para poder mostrarlas en un apartado de notificaciones.
// This listener is fired whenever a notification is received while the app is foregrounded
notificationListener.current = Notifications.addNotificationReceivedListener(notification => {
    // save it to the store
    notificationCommonHandler(notification)
});
La siguiente función que registramos se lanza siempre que el usuario interactúa con la notificación. En este caso también guardaremos la notificación pero probablemente también queramos navegar dentro de la aplicación a una pantalla determinada.
// This listener is fired whenever a user taps on or interacts with a notification
// (works when app is foregrounded, backgrounded, or killed)
responseListener.current = Notifications.addNotificationResponseReceivedListener(response => {
    notificationCommonHandler(response.notification);
    notificationNavigationHandler(response.notification.request.content);
});
El aspecto actual de nuestro App.js debería ser algo parecido a esto:
import React, { useEffect, useRef } from 'react';
import { StyleSheet, Text, View } from 'react-native';
import Constants from 'expo-constants';
import * as Notifications from 'expo-notifications';
import { Provider } from 'react-redux';
import { PersistGate } from 'redux-persist/integration/react';
import Navigator from './src/navigation';
import { store, persistor } from './src/state/store';

const registerForPushNotificationsAsync = async () => {
  let token;

  if (Constants.isDevice) {
    // we check if we have access to the notification permission
    const { status: existingStatus } = await Notifications.getPermissionsAsync();
    let finalStatus = existingStatus;


    if (existingStatus !== 'granted') {
      // if we dontt have access to it, we ask for it
      const { status } = await Notifications.requestPermissionsAsync();
      finalStatus = status;
    }
    if (finalStatus !== 'granted') {
      // user doesnt allow us to access to the notifications
      alert('Failed to get push token for push notification!');
      return;
    }

    // obtain the expo token
    token = (await Notifications.getExpoPushTokenAsync()).data;

    // log the expo token in order to play with it
    console.log(token);
  } else {

    // notifications only work on physcal devices
    alert('Must use physical device for Push Notifications');
  }

  // some android configuration
  if (Platform.OS === 'android') {
    Notifications.setNotificationChannelAsync('default', {
      name: 'default',
      importance: Notifications.AndroidImportance.MAX,
      vibrationPattern: [0, 250, 250, 250],
      lightColor: '#FF231F7C',
    });
  }

  return token;
}

export default function App() {
  const notificationListener = useRef();
  const responseListener = useRef();

  useEffect( () => {
    // Register for push notification
    const token = registerForPushNotificationsAsync();

    // This listener is fired whenever a notification is received while the app is foregrounded
    notificationListener.current = Notifications.addNotificationReceivedListener(notification => {
      notificationCommonHandler(notification);
    });

    // This listener is fired whenever a user taps on or interacts with a notification
    // (works when app is foregrounded, backgrounded, or killed)
    responseListener.current = Notifications.addNotificationResponseReceivedListener(response => {
      notificationCommonHandler(response.notification);
      notificationNavigationHandler(response.notification.request.content);
    });

    // The listeners must be clear on app unmount
    return () => {
      Notifications.removeNotificationSubscription(notificationListener);
      Notifications.removeNotificationSubscription(responseListener);
    };
  }, []);

  const notificationCommonHandler = (notification) => {
    // save the notification to reac-redux store
    console.log('A notification has been received', notification)
  }


  const notificationNavigationHandler = ({ data }) => {
    // navigate to app screen
    console.log('A notification has been touched', data)
  }

  return (
    <Provider store={store}>
        <PersistGate persistor={persistor} loading={null}>
            <View style={styles.container}>
                <Navigator />
            </View>
        </PersistGate>
    </Provider>
  );
}

const styles = StyleSheet.create({
  container: {
    flex: 1,
    backgroundColor: '#fff',
  },
});
Recordar que el hook de react useEffect se lanza cuando la pantalla se monta por primera vez, en este caso cuando la aplicación se lanza.
Y como siempre si has copiado bien y seguido todos los pasos deberías estar viendo por consola tu expo token registrado una vez ejecutado expo start.
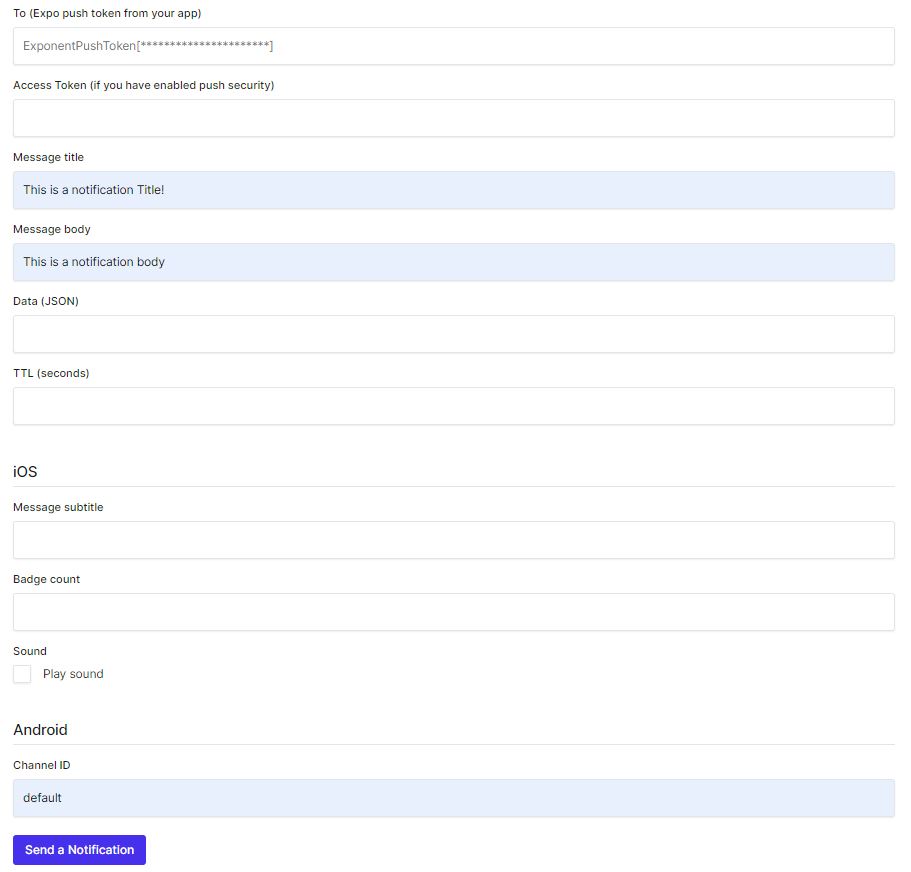
Jugando con Expo Push Notification Tool
Vamos a utilizar Expo Push Notification Tool para probar que nuestras notificaciones funcionan.
Copiamos nuestro expo token, el cual podemos obtener de la consola, rellenamos los campos title y body, y escribimos default en el Android Channel ID. Pulsamos en send notification y deberíamos estar viéndola en nuestro dispositivo físico.
Guardando el expo token en redux
Como no queremos que cada vez que se lance la aplicación se registre un nuevo expo token vamos a guardarlo en el estado de redux.
Si no sabes como configurar o no sabes lo que es el estado de react-redux te dejo aquí el post donde explicamos todo sobre ello.
Adding react-redux to your expo app.
Añadimos a nuestro actions/user.js una nueva acción y su correspondiente tipo.
export const SAVE_EXPO_TOKEN = 'SAVE_EXPO_TOKEN';
export const saveExpoToken = (expoToken) => ({ type: SAVE_EXPO_TOKEN, expoToken });
Ahora actualizamos nuestro reductor para manejar esta nueva acción.
import { combineReducers } from 'redux';

import { UPDATE_USERNAME, SAVE_EXPO_TOKEN } from '@actions/users';


const user  = (user = { username: '', expoToken: ''}, action) => {
    switch (action.type) {
        case UPDATE_USERNAME:
            return { ...user, username: action.username}
        case SAVE_EXPO_TOKEN:
            return { ...user, expoToken: action.expoToken}
        default:
            return user;
    }
}

export default combineReducers({ user });
Vamos a comprobar en nuestro App.js si tenemos guardado un expo token antes de registrar uno nuevo. Como en el componente App todavía no tenemos acceso al estado de redux, recordar que solo se tiene acceso desde dentro del provider, vamos a tener que hacer unas pequeñas modificaciones.
Creamos un nuevo componente que se llame StatefullApp al que vamos a llevar toda la lógica que acabamos de crear.
import React, { useEffect, useRef } from 'react';
import { StyleSheet, Text, View } from 'react-native';
import Constants from 'expo-constants';
import * as Notifications from 'expo-notifications';
import { Provider } from 'react-redux';
import Navigator from './src/navigation';
import { store, persistor } from './src/state/store';

const registerForPushNotificationsAsync = async () => {
    let token;

    if (Constants.isDevice) {
        // we check if we have access to the notification permission
        const { status: existingStatus } = await Notifications.getPermissionsAsync();
        let finalStatus = existingStatus;


        if (existingStatus !== 'granted') {
            // if we dontt have access to it, we ask for it
            const { status } = await Notifications.requestPermissionsAsync();
            finalStatus = status;
        }
        if (finalStatus !== 'granted') {
            // user doesnt allow us to access to the notifications
            alert('Failed to get push token for push notification!');
            return;
        }

        // obtain the expo token
        token = (await Notifications.getExpoPushTokenAsync()).data;

        // log the expo token in order to play with it
        console.log(token);
    } else {

        // notifications only work on physcal devices
        alert('Must use physical device for Push Notifications');
    }

    // some android configuration
    if (Platform.OS === 'android') {
        Notifications.setNotificationChannelAsync('default', {
            name: 'default',
            importance: Notifications.AndroidImportance.MAX,
            vibrationPattern: [0, 250, 250, 250],
            lightColor: '#FF231F7C',
        });
    }

    return token;
}


const StatefullApp = () => {
    const notificationListener = useRef();
    const responseListener = useRef();

    useEffect(() => {
        // Register for push notification
        const token = registerForPushNotificationsAsync();

        // This listener is fired whenever a notification is received while the app is foregrounded
        notificationListener.current = Notifications.addNotificationReceivedListener(notification => {
            notificationCommonHandler(notification);
        });

        // This listener is fired whenever a user taps on or interacts with a notification
        // (works when app is foregrounded, backgrounded, or killed)
        responseListener.current = Notifications.addNotificationResponseReceivedListener(response => {
            notificationCommonHandler(response.notification);
            notificationNavigationHandler(response.notification.request.content);
        });

        // The listeners must be clear on app unmount
        return () => {
            Notifications.removeNotificationSubscription(notificationListener);
            Notifications.removeNotificationSubscription(responseListener);
        };
    }, []);

    const notificationCommonHandler = (notification) => {
        // save the notification to reac-redux store
        console.log('A notification has been received', notification)
    }


    const notificationNavigationHandler = ({ data }) => {
        // navigate to app screen
        console.log('A notification has been touched', data)
    }

    return (
        <View style={styles.container}>
            <Navigator />
        </View>
    );
}

export default function App() {

    return (
      <Provider store={store}>
        <PersistGate persistor={persistor} loading={null}>
            <StatefullApp />
        </PersistGate>
      </Provider>
    );
}

const styles = StyleSheet.create({
    container: {
        flex: 1,
        backgroundColor: '#fff',
    },
});
Ahora que ya podemos acceder al estado de redux dentro de StatefullApp obtenemos el expoToken,
const expoToken = useSelector( state => state.user.expoToken);
y comprobamos si tenemos uno guardado antes de lanzar la función de registrarnos
if ( expoToken === ''){
    const token = registerForPushNotificationsAsync();
}
Ahora deberemos guardarlo en el estado en caso de que sea la primera vez que obtenemos uno.
if ( expoToken === ''){
    const token = registerForPushNotificationsAsync();
    dispatch(saveExpoToken(token));
}
Quedando nuestro App.js de la siguiente manera:
import React, { useEffect, useRef } from 'react';
import { useSelector, useDispatch } from 'react-redux';
import { StyleSheet, Text, View } from 'react-native';
import Constants from 'expo-constants';
import * as Notifications from 'expo-notifications';
import { Provider } from 'react-redux';
import Navigator from './src/navigation';
import { store, persistor } from '@state/store';
import { saveExpoToken } from './src/actions/users';

const registerForPushNotificationsAsync = async () => {
  let token;

  if (Constants.isDevice) {
    // we check if we have access to the notification permission
    const { status: existingStatus } = await Notifications.getPermissionsAsync();
    let finalStatus = existingStatus;


    if (existingStatus !== 'granted') {
      // if we dontt have access to it, we ask for it
      const { status } = await Notifications.requestPermissionsAsync();
      finalStatus = status;
    }
    if (finalStatus !== 'granted') {
      // user doesnt allow us to access to the notifications
      alert('Failed to get push token for push notification!');
      return;
    }

    // obtain the expo token
    token = (await Notifications.getExpoPushTokenAsync()).data;

    // log the expo token in order to play with it
    console.log(token);
  } else {

    // notifications only work on physcal devices
    alert('Must use physical device for Push Notifications');
  }

  // some android channel configuration
  if (Platform.OS === 'android') {
    Notifications.setNotificationChannelAsync('default', {
      name: 'default',
      importance: Notifications.AndroidImportance.MAX,
      vibrationPattern: [0, 250, 250, 250],
      lightColor: '#FF231F7C',
    });
  }

  return token;
}


const StatefullApp = () => {
  const dispatch = useDispatch();

  const expoToken = useSelector(state => state.user.expoToken);

  const notificationListener = useRef();
  const responseListener = useRef();

  useEffect(() => {
    // Register for push notification
    if (expoToken === '') {
      const token = registerForPushNotificationsAsync();
      dispatch(saveExpoToken(token));
    }

    // This listener is fired whenever a notification is received while the app is foregrounded
    notificationListener.current = Notifications.addNotificationReceivedListener(notification => {
      notificationCommonHandler(notification);
    });

    // This listener is fired whenever a user taps on or interacts with a notification
    // (works when app is foregrounded, backgrounded, or killed)
    responseListener.current = Notifications.addNotificationResponseReceivedListener(response => {
      notificationCommonHandler(response.notification);
      notificationNavigationHandler(response.notification.request.content);
    });

    // The listeners must be clear on app unmount
    return () => {
      Notifications.removeNotificationSubscription(notificationListener);
      Notifications.removeNotificationSubscription(responseListener);
    };
  }, []);

  const notificationCommonHandler = (notification) => {
    // save the notification to reac-redux store
    console.log('A notification has been received', notification)
  }


  const notificationNavigationHandler = ({ data }) => {
    // navigate to app screen
    console.log('A notification has been touched', data)
  }

  return(
    <View style={styles.container}>
      <Navigator />
    </View>
  )
}

export default function App() {

  return (
    <Provider store={store}>
        <PersistGate persistor={persistor} loading={null}>
            <StatefullApp />
        </PersistGate>
    </Provider>
  );
}

const styles = StyleSheet.create({
  container: {
    flex: 1,
    backgroundColor: '#fff',
  },
});
Buenas prácticas
Como habrás visto el App.js empieza a ser un archivo demasiado largo y conviene que en la manera de lo posible se mantenga un archivo pequeño y legible. Además la función de registrar un expo token no interfiere con el estado de la pantalla más alla de retornarlo, por lo que vamos a sacarlo a un directorio de funciones.
.
├── src
│   ├── state
│   ├── actions
│   ├── utils
│   │   └── libraries.js
│   ├── navigation
│   ├── scenes
│   ├── components
│   └── atoms
└── App.js
Creamos un nuevo directorio llamado utils dentro del cual creamos un archivo libraries.js donde introduciremos las funciones como esta que dependen de librerías externas.
Recuerda realizar el import desde App.js.
import { registerForPushNotificationsAsync } from '@utils/libraries';
Si no sabes como configurar los alias puedes visitar nuestro post sobre primeros pasos y buenas prácticas.
Añadiendo soporte para la navegación
Si no tienes configurado el navegador en tu aplicación de expo te dejo aquí el post donde explicamos como configurarlo.
Añadiedo react-navigation a tu app de expo
En muchos casos vamos a querer navegar a una pantalla específica cuando el usuario pulsa en una notificación. Para ello tenemos que acceder a la prop navigate del navegador, pero igual que ocurría antes esa prop solo es accesible dentro del Navigation Container. Pero en este caso vamos a solucionar el problema de una manera diferente, usando referencias. Por si no tienes muy claro que es una referencia de react, básicamente es un identificador de un componente que te permite utilizar sus métodos desde funciones externas.
Si quieres una explicación más exhaustiva puedes esperar a nuestro post sobre referencias o visitar la documentación.
Creamos la referencia que le vamos a pasar al navegador para poder acceder a él a pesar de estar “un nivel por encima”.
const nav = useRef();
Y se la añadimos a nuestro navegador.
return (
    <View style={styles.container}>
        <Navigator ref={nav} />
    </View>
)
Ahora tenemos que hacer una pequeña modificación en src/navigations/index.js para unir esta referencia a nuestro navegador.
import React, { forwardRef } from 'react';
import { NavigationContainer} from '@react-navigation/native';
import { MainStackNavigator } from './MainStackNavigator';


const RootNavigator = forwardRef((props, ref) => {

    return (
        <NavigationContainer ref={ref} {...props}>
            <MainStackNavigator />
        </NavigationContainer>
    )
})

export default RootNavigator;
Mediante la función forwardRef de react le podemos a pasar a un componente hijo una referencia desde el padre, para que pueda ser usado por este.
Volviendo al componente StatefullApp vamos a definir que queremos que ocurra cuando el usuario pulse en la notificación utilizando para ello la función notificationNavigationHandler que ya habiamos definido.
Supongamos que en nuestra notificación introducimos un campo data con la siguiente estructura.
{
    uuid: “”,
    navTo: “”,
    params: “”
}
Si estás utilizando una API es probable que todos los objetos estén serializados y tengan un uuid asociado, además vamos a pasarle una referencia de a donde queremos navegar y unos parámetros como podría ser un nombre de usuario.
Esto es una caso muy común en el que, por ejemplo, quieres ir al perfil de una persona que ha empezado a seguirte.
const notificationNavigationHandler = ({ data }) => {
    // navigate to app screen
    console.log('A notification has been touched', data)

    switch (data.navTo) {
      case 'details':
        nav.current.navigate('Details');
        return;
      default:
        nav.current.navigate('Home');
    }
}
En nuestro caso vamos a aprovechar la pantalla de Details.js que ya habíamos utilizado cuando creamos nuestros navegadores.
Modificando el icono y el color de la notificación en Android
Por último si quieres modificar el color y el icono de la notificación podrás hacerlo aunque solo para dispositivos android. Para ello vamos a modificar el app.json de la aplicación. Vamos a añadirle una nueva clave a la entrada expo del objeto json.
"plugins": [
      [
        "expo-notifications",
        {
          "icon": "./assets/icon.png",
          "color": "#ffffff",
          "sounds": [
            "./local/path/to/mySound.wav",
            "./local/path/to/myOtherSound.wav"
          ],
          "mode": "production"
        }
      ]
    ]
Donde podemos modificar el icono, el color y los sonidos de la notificación.
Y esto ha sido todo sobre la parte de notificaciones en el lado de cliente, espero que te haya servido y nos vemos en el siguiente!
