Adding react-redux to your expo app

Any app, no matter how small, has to keep some sort of state with the necessary data to display to the user. The best way to integrate state in our expo project so that it is efficient, easy to use and to avoid corruption is to use react-redux.
expo
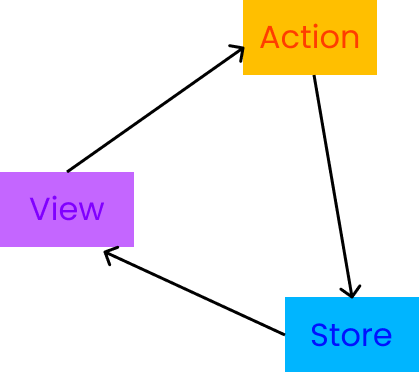
Redux is the best way to keep track of state inside our app since it allows us to access it from any part of the app, it simplifies the way to access information and helps us keep our data clean. The way Redux works is based on a data flow model.
This is a simplified diagram of how Redux works.
Let's suppose we're in front of a screen in which we can modify some data in our application, say, our username. Assume we have a text input where we type our name and a Save button.
Let's suppose we're in front of a screen in which we can modify some data in our application, say, our username. Assume we have a text input where we type our name and a Save button.
We'll make it so that when we press the Save button an action will be launched. Actions are the way in which we can change our application's state. These actions are received by a reducer, which is a function whose purpose is to update the state.
With this setup, our profile, which shows our username which in turn is fetched from the app state is updated automatically.
Installing react-redux
react-redux is a library which wraps Redux so that it works better with React Native (and React). To install it, add the necessary packages from the project root:
yarn add react-redux
yarn add redux-thunk
yarn add redux-persist
yarn add @react-native-async-storage/async-storage
Adding redux to the project
The first thing to do is to add the Redux Provider and Redux-persist PersistGate components to our App.js file. The first one is the component which make the state available throughout the app and the second is in charge of reloading the data when the application is reopened.
Import them
import { Provider } from 'react-redux';
import { PersistGate } from 'redux-persist/integration/react';
And wrap the main component in the Provider and PersistGate components:
export default function App() {
  return (
    <Provider>
        <PersistGate>
            <View style={styles.container}>
                <Navigator />
            </View>
        </PersistGate>
    </Provider>
  );
}
Now we have to configure the store, which keeps track of the application's state. For that we create a new directory inside src, which I've called state. Inside it, create two files:
store.jsreducers.js
We're also going to create a folder called actions which will hold all of our app's actions. Within it, we create a file called user.js which will hold the actions related to users.
It's very likely your app will grow to have a large number of actions, which is why it is recommended to keep them separate. This will make debugging as easy as possible when things start to go sideways.
Overall, this is our project's current layout:
.
├── src
│   ├── state
│   │   ├── store.js
│   │   └── reducers.js
│   ├── actions
│   │   └── user.js
│   ├── navigation
│   ├── scenes
│   ├── components
│   └── atoms
└── App.js
Creating the first action
We'll create our first action in src/actions/user.js. It'll be in charge of updating the username for our app's user.
Actions have a type, which is used to tell the reducer which part of the state it should update.
Dentro de src/actions/user.js vamos a crear nuestra primera acción encargada de actualizar el nombre de usuario que usa nuestra aplicación.
We create the type as a constant. You could just use plain strings, but doing it this way allows you to export it from the module and enforce consistency with your JS linter.
export const UPDATE_USERNAME = 'UPDATE_USERNAME';
And we create the corresponding action factory. An action factory is just a function that outputs an object with the type field and any other data required to update the state.
export const updateUsername = (username) => ({ type: UPDATE_USERNAME, username });
Creating the first reducer
In reducers.js, we create the first reducer:
const user  = (user = { username: ''}, action) => {
    switch (action.type) {
        case UPDATE_USERNAME:
            return { username: action.username }
        default:
            return user;
    }
}
This particular reducer will take care to update our user's data. Reducers always receive two parameters.
- The first one, is the current application state. The initial application state just consists of an object with the property
usernameinside it. Since the user hasn't entered their name, theusernameproperty defaults to the empty string. It is common practice to encode the initial application state using default function arguments in reducers. - The second is the action to handle. For now we only have one kind of action but in the future we'll have one for updating the email address, another to update the password, one for the profile photo...
It's also common practice to use a switch statement to divide the logic which must be performed for each action in a reducer. On each branch of the switch statement, we return an updated version of the state, taking care that it is a new object and not just the same object with updated properties (this is critical for React to work properly).
Finally, we always return the same, unmodified, state object in the default branch of the switch statement. This is so that in case we receive an action which is not handled by this reducer (e.g. some action that updates some other part of the state), the state is not modified.
Remember to add the import for the action type:
import { UPDATE_USERNAME } from '@actions/users';
If you're not sure how to make the aliases work, check out our post on First steps and good practices.
Anyway, if you can't be bothered, the route should be the following:
import { UPDATE_USERNAME } from '../actions/users';
Finally export the reducer like this:
export default combineReducers({ user });
Imagine that in the future you want to keep state about movies. You'll probably need a movies reducer, which handles it's own set of actions. The best way to keep track of state is to keep the actions related to each kind of object in your data model in a different reducer. However, when it comes to exporting them, we need to combine all the reducers so that we end up with a single entrypoint for our state. Redux provides a helper function to do this and we shall use it:
import { combineReducers } from 'redux';
export default combineReducers({ user });
Configuring the store
Finally, we'll be configuring our applications state. By the way, we could start to make something a little more appealing visually.
import { createStore, applyMiddleware } from 'redux';
import thunk from 'redux-thunk';

import reducers from './reducers';
import { persistStore, persistReducer } from 'redux-persist';
import autoMergeLevel2 from 'redux-persist/lib/stateReconciler/autoMergeLevel2';
import AsyncStorage from '@react-native-async-storage/async-storage';

const persistConfig = {
    key: 'root',
    storage: AsyncStorage,
    stateReconciler: autoMergeLevel2,
}
We create our persistence configuration object specifying what we want to be saved asynchronously. We also specify that we'll use the function autoMergeLevel2 to reconcile the application state in case the system encounters some error.
Create the state and its corresponding persistor and export it like this:
const initialState = {};

const persistedReducer = persistReducer(persistConfig, reducers);
const store = createStore(persistedReducer, initialState, applyMiddleware(thunk));
const persistor = persistStore(store);

export { store, persistor };
We only need to add it to our application. Import the store and persistor from App.js
import { store, persistor } from '@state/store';
and pass them as props to the Provider and PersistGate components, respectively.
export default function App() {
  return (
    <Provider store={store}>
        <PersistGate persistor={persistor} loading={null}>
            <View style={styles.container}>
                <Navigator />
            </View>
        </PersistGate>
    </Provider>
  );
}
Accessing and changing the state
Let's modify our Profile.js file. If you don't know what file I'm talking about check out our last post where we configure our application structure with react-navigation.
We'll get the username from the app state using the useSelector hook and then we'll display it on the screen.
import React from 'react';
import { SafeAreaView, StyleSheet, Text } from 'react-native';
import { useSelector } from 'react-redux'


export const ProfileScreen = ({ }) => {

    const user = useSelector( state => state.user);

    return (
        <SafeAreaView style={styles.container}>
            <Text style={{color: 'white'}}>
                Welcome {user.username}!
            </Text>
        </SafeAreaView>
    )
}

const styles = StyleSheet.create({
    container: {
        flex: 1,
        backgroundColor: 'blue',
        alignItems: 'center',
        justifyContent: 'center',
    },
});
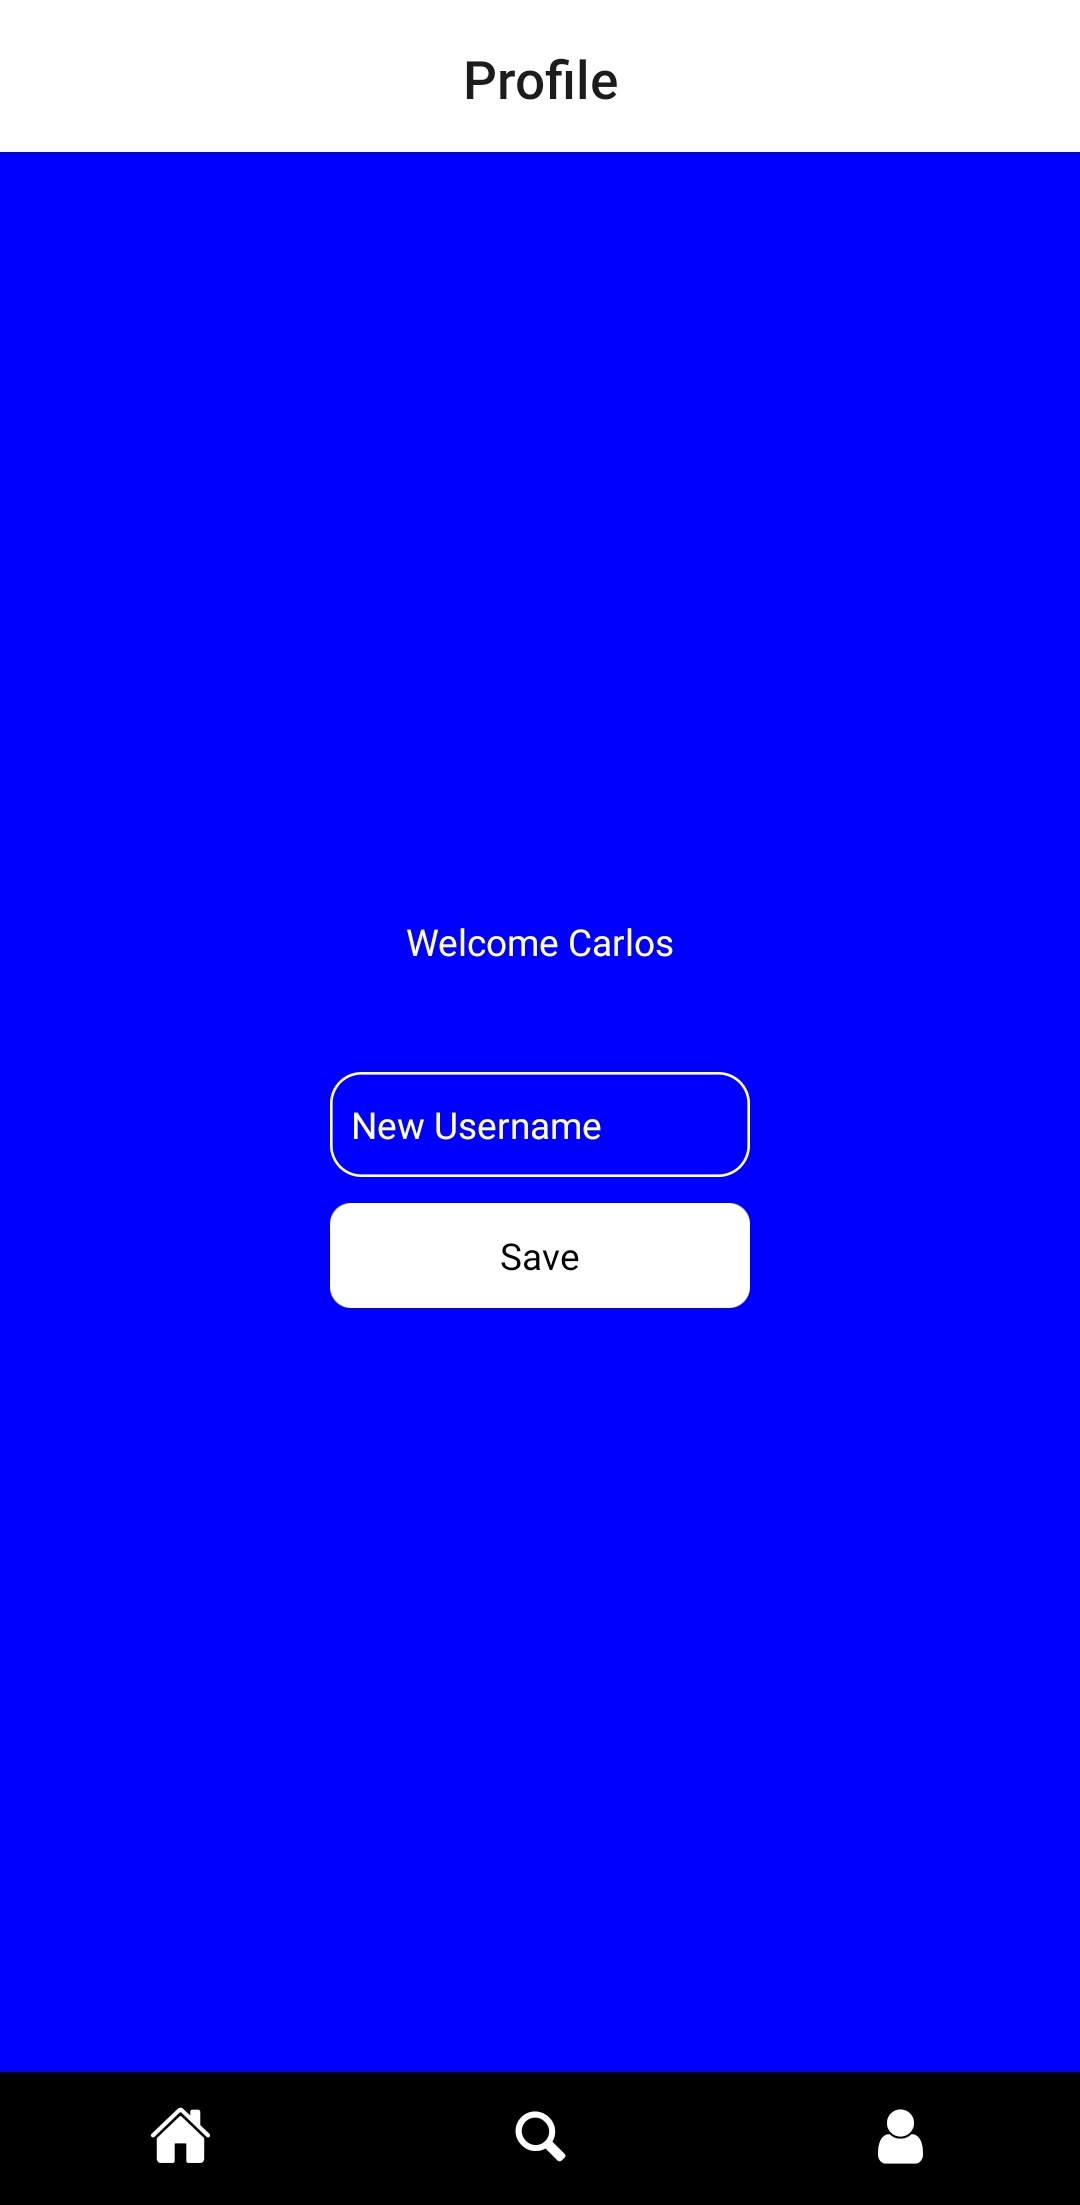
Right now, you should only be seeing Welcome !, since we've not inputted the username yet.
To change the username, we'll introduce a TextInput Component and a save button.
<View style={{marginTop: 40}}>
    <TextInput
        style={{ height: 40, borderColor: 'white', borderWidth: 1, borderRadius: 12, padding: 8, color: 'white'}}
        onChangeText={text => setNewUsername(text)}
        value={newUsername}
        placeholder='New Username'
        placeholderTextColor='white'
    />
    <Button
        style={{height: 40, width: 160, backgroundColor: 'white', borderRadius: 8, marginTop: 10}}
        text='Save'
    />
</View>
Since this is the first time we encounter the TextInput component I'll go over the main props.
-
We use the
styleprop to change the shape of the button that will contain theTextInput, in this case we give it a height of40px, a white border and rounded corners. We can also change the text color (with the keycolor), and here we set it to be white. -
To save the new username inputted by the user we'll use a variable from the screen state. Via the
valueprop we tell React that the value of theTextInputcomponent isnewUsername. We also use theonChangeTextprop to tell React to usesetNewUsernameto change that value.
If you can't recall how to create a state variable inside a screen, it's done with the following code:
const [newUsername, setNewUsername] = useState('');
in which we're specifying that the initial value is the empty string.
We make it so that the value shown when nothing has been inputed yet is New Username, with the placeholder prop and we make the placeholder color to be white.
Finally we add logic to update the username, for that we create a new function called saveUsername and bind it to our button.
<Button
    style={{ height: 40, width: 160, backgroundColor: 'white', borderRadius: 8, marginTop: 10 }}
    text='Save'
    onPress={ () => saveUsername()}
/>

const saveUsername = () => {
    // in case the username hasnt been updated
    if(newUsername === '') return;

    dispatch( updateUsername(newUsername) );
}
We import the action from our actions repository and execute it with the dispatch function. dispatch is the way of firing actions in react-redux.
The full Profile.js code should look like this:
import React, { useState } from 'react';
import { useSelector, useDispatch } from 'react-redux';
import { SafeAreaView, StyleSheet, Text, TextInput, View } from 'react-native';
import { Button } from '@atoms';
import { updateUsername } from '@actions/users';


export const ProfileScreen = ({ }) => {
    const dispatch = useDispatch();

    const user = useSelector( state => state.user );
    const [newUsername, setNewUsername] = useState('');

    const saveUsername = () => {
        // in case the username hasnt been updated
        if(newUsername === '') return;

        dispatch( updateUsername(newUsername));
    }

    return (
        <SafeAreaView style={styles.container}>
            <Text style={{color: 'white'}}>Welcome {user.username}</Text>

            <View style={{marginTop: 40}}>
                <TextInput
                    style={{ height: 40, borderColor: 'white', borderWidth: 1, borderRadius: 12, padding: 8, color: 'white'}}
                    onChangeText={text => setNewUsername(text)}
                    value={newUsername}
                    placeholder='New Username'
                    placeholderTextColor='white'
                />
                <Button
                    style={{ height: 40, width: 160, backgroundColor: 'white', borderRadius: 8, marginTop: 10 }}
                    text='Save'
                    onPress={ () => saveUsername()}
                />
            </View>
        </SafeAreaView>
    )
}

const styles = StyleSheet.create({
    container: {
        flex: 1,
        backgroundColor: 'blue',
        alignItems: 'center',
        justifyContent: 'center',
    },
});
If you managed to copy all of the code and followed all the steps, your app should be working like it's shown in this video. From here on, it's mostly adding more objects to your app.
I hope this post was useful, see you in the next one!
